Merida
Brave
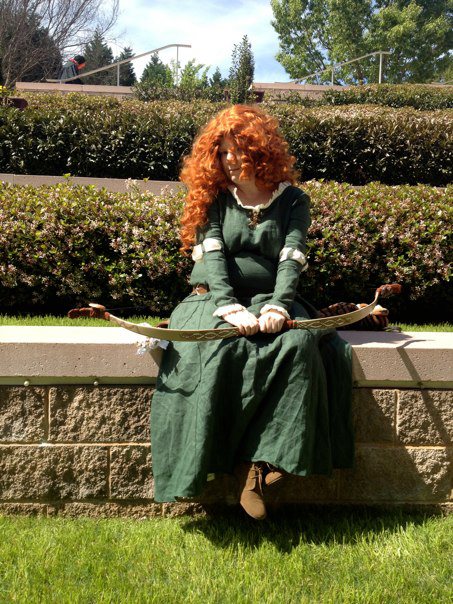
I knew I wanted to make a Merida costume before Disney/Pixar's Brave even came out, simply from seeing the first trailer in the theater. Not only is she a fiesty warrior princess, she also is a reflection of my own Scottish heritage. With this costume, I didn't just step out of my comfort zone. I took a leisurely stroll by making my own bow, arrows and wig!
But I'll first start with the dress: The dress is a two-in-one deal. Since Brave is set in the medieval Scottish Highlands, I wanted to make the costume as historically accurate as possible. During this time, most women had a handful of dresses they wore all the time, with a second under-dress called a chemise. I based both dresses off a kirtle pattern from Butterick.
The chemise required no alteration aside from adjusting for my short height. I added ruffles at the wrists and neckline, by making 3" wide strips twice as long as their respective edges, folding them over and gathering them to fit. The fabric is a cream-colored, light papyrus linen.
The color of the overdress looks anywhere from blue to green depending on the lighting in the movie, so I decided to go with the color that looks best on me. So I chose a hunter green, medium-weight linen. While the majority of the dress followed the base pattern, I created a little keyhole opening in the neckline to match the movie. Then I put in gold grommets with my handy snap-making kit and tied it closed with a soft leather thong. I altered the sleeves to be two sections, attached with narrow strips. I made sure to allow enough room for me to draw my bow for pictures, which was the motivation for the dress's design in the movie. I made the sleeve sections as narrow as I could without straining the seams.
After both dresses were complete, I attached the over-dress to the chemise at the neckline, cuffs and zipperline for easy on and off. While zippers aren't historically accurate, it makes putting on the costume a lot easier. And my wig covers most of it anyway. Then I just have to pull the chemise out at the elbows to make the elbow poofs and I'm good to go! I also have added a pair of white tights and a pair of soft suede ankle boots from Amazon.com.
The wig is composed of three pieces: a base long, curly wig and two long curly pigtail clips, all from Arda. With the base wig, I did everything one isn't supposed to do with a wig... by slinging it around, throwing it on the floor, flipping it around, shaking it and letting the cats play with it. When I was done the wig was three times as big as it originally was. Then I cut apart the clips and sewed and glued the wefts into the wig.
As a neat historical touch, I also created two mini-braids from the extra hair and sewed them in the massive curls. Ancient Celtic warriors would put braids in their hair as a sign of courage and honor, so I thought that such a brave princess should have a few!
The bow was as rewarding as it was frustrating. My woodworking skills weren't up to the task of making a bow from scratch, so I bought a base bow from a LARP supply site. I repainted it to look like birchwood and handwrapped the handle and ends with soft suede strips. The red and green bands on either end of the handle are scraps of suede, covered with fabric paint to give it a marbled look.
For the design, I found an image reproduced by Plua on deviantArt and shrunk down the picture to fit the bow. Then I used pattern transfer paper to trace it onto the bow. I painted over it with brown paint and filled it in with white paint. The design on the ends was free-handed. I love how the brown paint gives the bow a wood-burned look.
The rocks on the bottom of the bow are real rocks and glued. I was going to use paperclay, but the rocks were a souvenir my mom brought home from a beach trip she took with my dad when I was a kid. So they give a sentimental touch. The medallion, however, is paperclay, painted bronze with a pin backing glued on. Both are attached with leather thongs tightly tied to the bow.
The arrows are birchwood dowels, cut in half. I glued feathers to the end and notched them like real arrows, then added a thick brown thread to make the feathers looke like they are tied on. For pictures, I also added a paperclay tip to one of my arrows. The quiver was found on eBay and has a S-clip to allow for easy on and off so I can comfortably sit. It's attached to a leather belt from Wal-Mart.
Model: Kat
Photo Credit: Graeme Rock
Back to the Gallery...
Full costume
$1,100 - 1,300
Dress
$600 - 750
Wig
$240
Bow
$200 + cost of base bow
Arrows (set of 5)
Non-tipped - $50
Tipped - $100